How to Install Your Winter Cover
General Winter Cover Installation Procedures
- Since the cover is designed to rest on the pool’s water, it is important to be sure your pool in not leaking prior to installation.
- Your cover is made from extremely strong and durable material. However, it is required that your cover be protected from sharp corners, rough edges, or any hard surfaces that may cause abrasion. Padding such as old towels, foam remnants or other similar materials are recommended.
- It is important that covers be installed properly and snugly so that the wind will not cause damage to the cover by getting underneath, causing it to billow or flap.
Inground Pool Cover Installation
- Be sure that the cover will be supported by the water in the pool and that the cover is not in direct contact with any sharp rough or abrasive surfaces.
- Lower the water level in your pool below the skimmer (No more than 18 inches below the coping).
- Place the cover on the ground and spread evenly over the pool.
- Insert unfilled water bags into the water bag loops (for covers without loops, lay the water bags directly on to the outside perimeter of the cover).
- The water bags must cover the entire perimeter of the cover to prevent wind from getting under the cover and causing the cover to billow or flap.
Caution: such billowing or flapping in the wind can cause serious damage to your cover, so be sure the waterbags are placed end-to- end.
- Fill the water bags. If you are in an area of extreme cold, fill the water bags only half full to allow for ice expansion.
Above Ground Pool Cover Installation
- Be sure that the cover will be supported by the water in the pool and that the cover is not in direct contact with any sharp, rough or abrasive surfaces.
- Lay out the cover on the ground. Thread the cable through the grommets (or loops). The cable must remain on the outside of the cover, except between the pairs of grommets.
- For covers with a turn buckle and clamps, open the turn buckle until only the ends of the screw show on the inside. Pull one end of the cable through the loop of one turnbuckle screw and secure it with a cable clamp. Pull the other end of the cable through the other loop. Pull the cable tight and secure it with the second clamp. Tighten the turnbuckle by turning it. Make sure the cable lies on the outside of the cover all around the pool, except where it goes through the pairs of grommets. The cable must fit tightly against the wall of the pool to prevent wind from getting underneath the cover. To loosen or remove the cable, turn the turnbuckle in the opposite direction.
- For covers with a winch, insert one cable through the hole at one end of the winch and into the center spindle. Turn the spindle a few times to secure the cable. Insert the other cable end through the other hole on the winch and pull the cable through the spindle as far as it will go. Turn the winch handle to tighten the cable. Make sure the cable lies on the outside of the cover all around except where it goes through the pairs of grommets. The cable must fit tightly against the wall of the pool to prevent wind from getting underneath the cover. To loosen or remove the cable, press the lever on top of the winch and turn the handle in the opposite direction.
- Before placing the cover over the pool, the pools water level should not be less then 6” from the top of the skimmer. Where a through-the-wall-skimmer is used, cover up the skimmer opening. Inflate a flotation pillow and secure the pillow in the center of the pool by tying grommeted ends with a nylon rope to the pool side wall. Place the cover over the pillow to form a loose pyramid letting the cover fall on the water around the circumference. Pull the end of the cover over the pool wall. It is important that the cover fits snugly against the wall to prevent wind from getting under the cover and causing the cover to billow and flap. Such billowing and flapping can cause serious damage to the cover. If you cannot get a perfectly snug fit, block any openings between the cover and the pool wall.
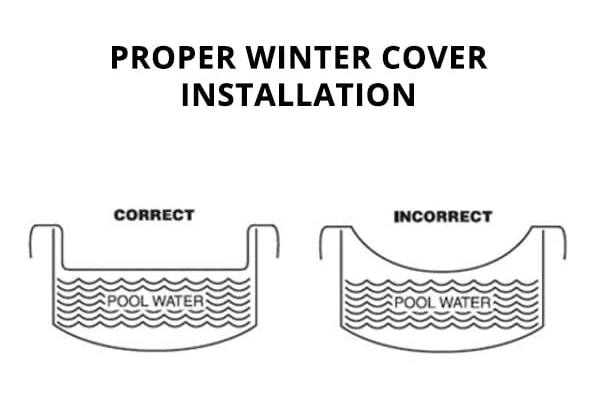
Once your Winter cover has been installed, ensure it is sitting on the water properly according to the diagram below.


