How to Quickly and Easily Cover Your Above Ground Pool
We know that closing your above ground pool can be a hassle and a disappointing sign that cold weather is on the way. So, to make things easier for you, we’ve created this guide so you can close your pool with minimal fuss.
Before Installing the Cover
A couple of days before closing your pool we suggest you check that it is in good shape. Any leaks or other issues should be dealt with before installing the pool cover.
Winterizing
The day you plan to close your pool you’ll need to go through the regular winterizing steps: cleaning your pool and balancing the chemicals.
Some of you may have noticed that we didn’t mention lowering the water levels. Well, with an above ground pool it might not be necessary.
Lowering the water levels protects the skimmer against freezing in winter. However, if you remove the hose from the bottom of your skimmer and install a winter cover plate then you won’t have to worry about freezing.
Not only will this step save some time, it’s actually better for your winter cover.
Installing the Winter Cover
Check around the pool area. Make sure that your pool cover isn’t going to be in direct contact with any sharp or abrasive areas.
Lay your cover on the ground and thread your cable through the loops (grommets). The cable should be on the outside of the cover, except when passing through the loops.
If your pool has turnbuckles and clamps, then begin by opening the turnbuckles so only the ends of the screws are showing on the inside. Pull one end of the cable through the loop of one turnbuckle screw and secure it with a cable clamp.
Then, repeat this same process from the other side. Tighten the turnbuckle by turning it.
Make sure the cable is on the outside of the cover around the pool. Pull the cover down so it is secured by the cable when needed.
For the cable to work properly it needs to fit tightly against the pool’s wall (to stop wind from going underneath it).
If your cover has a winch start by inserting one cable through the hole at one end of the winch and into the center spindle. Secure the cable by turning the spindle.
Insert the other cable end through the other hole on the winch and pull the cable through the spindle as far as it will go. Finish by turning the winch to tighten the cable.
Again, make sure that the cable is covering the pool cover and gripping the pool wall firmly.
Inflate an air pillow and secure it in the center of the pool. Do this by tying the grommet-ends with nylon rope to the side of the pool wall.
Bring the cover over the pillow and around the circumference of the pool. Make sure that the cover fits snugly.
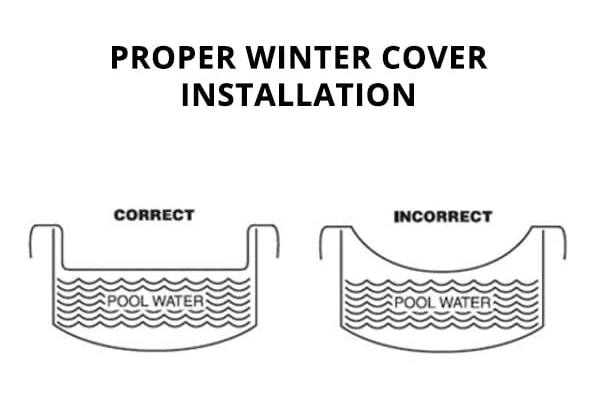
Once your cover has been secured on the pool, ensure it is sitting on the water properly according to the diagram below.

We hope this guide makes your next pool closing a lot easier. Do you have any tips, tricks or questions about covering your above ground pool? If so, please them share below!


