Closing an Above Ground Pool for the Winter
At the end of the swimming season, you must follow these directions to winterize and make your pool ready for the Winter. The following guide will work for above ground pools sanitized using chlorine or salt water.
Step 1) Prior to Closing
Several days prior to closing your pool, test the water for the pH level, total alkalinity, and chlorine / salt water levels. The water balance is important to protect the pool from corrosion or scale build-up during Winter shut down.
Step 2) Perform a Complete Inspection
-
a) Finding Leaks
Caution: Make sure the pool is not leaking before covering. Serious structural damage can occur if leaks go undetected through Winter shut down from ice movement. Maintain a strict leak inspection during the fall, Winter and Spring months.
To determine if the pool is leaking, mark the liner at the water level with a non-permanent marking device such as tape or a wax pencil and observe the water level in the pool for 10 to 14 days after the pool has been closed for the season.
-
b) Check the Liner
Make sure the top of the liner is still attached to the pool wall. Make sure there are no leaks. Repair any liner holes with a vinyl patch: any small punctures in the liner can be easily repaired with underwater repair kits available at Pool Supplies Canada. Do not remove the liner from the pool, as removal of the liner will void the existing warranty.
-
c) Check all Joints and Screws
Make sure all the frame joints are fitting together properly and make sure the pool wall has not shifted from the bottom rail. Ensure all screws and bolts are tight.
-
d) Check for Rust
Periodically inspect the metal parts for any corrosion – especially around the skimmer area. If corrosion is found, immediate corrective action must be taken. Wire brush any rust and add a coat of enamel primer followed by a coat of color matching anti-rust enamel paint. Pool structure failure could result in major property damage and bodily harm. Paint any scratches with anti-rust paint.
Step 3) Add Closing Chemicals
Add your pool closing chemical kit and allow chemicals to circulate. If you have a salt water pool, use a closing chemical kit with a non-chlorine shock product, like our very own Pool Supplies Canada Premium Pool Closing Chemical Kit.
Step 4) Lower the Water Level
-
a) Lower the water level in your pool until it is about 6" (15 cm) below the skimmer opening. You may plug the return jet hole at this time.** IMPORTANT ** DO NOT PLUG THE SKIMMER DRAIN HOLE (located at the base of the skimmer). Remove all hoses attached to the skimmer and return fittings. Do not let water freeze in the skimmer. Leave the skimmer attached to the pool wall and ensure that the skimmer lid is installed.DO NOT DRAIN ALL THE WATER OUT OF THE POOL.
Please Note: in areas where temperatures consistently reach -30 to -40 degrees, lower the water level until it is about 18" (46 cm) deep and do not use a winter cover or alternatively ensure minimal accumulation of snow, ice or water on top of the cover.DO NOT DRAIN ALL THE WATER OUT OF THE POOL. If you wish to keep more then 24" of water in your pool, please see your local dealer for assistance.
-
b) The inside water level must be maintained at least 3” (76 mm) below the skimmer opening throughout the winter. Surplus water must be removed by pumping, draining or siphoning, so that it doesn’t enter the skimmer during the winter period.
Or
-
c) Ensure skimmer drain is left open and unobstructed so water can freely flow out.DO NOT PLUG THE SKIMMER. Remove all hoses attached to the skimmer and return fittings. Do not let water freeze in the skimmer. Leave the skimmer attached to the pool wall and ensure that the skimmer lid is installed.
Step 5) Filter Preparation
Disconnect the hoses from the filter. Follow the closing instructions in your filter manual.
Step 6) Install Your Winter Cover
Now you can cover your above ground pool with a Winter pool cover. It should be in a state of good repair to do the best possible job of protecting your pool through the Winter months. Feed the cable through each grommet hole in the cover and secure tightly using the winch to prevent the edges of the cover from being caught by blowing wind. If you are installing an Eliminator Winter Cover, follow the instructions included with the product, as installation of these types of covers will vary.
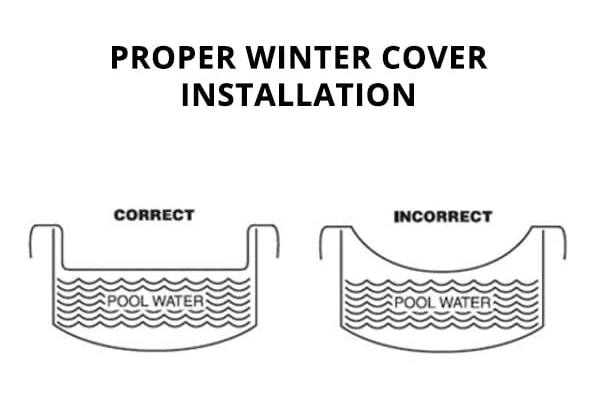
Once your Winter cover has been installed, ensure it is sitting on the water properly according to the diagram below.

For more information and other closing products for your Above Ground Pool, visit the Winter Supplies section of our website.


